Friday 31 March 2017

John's Tree 2

 Looking like a cauliflower/nuclear explosion, is John's tree.

The foliage shape is terrific.

It will be interesting to see the next stage.

Do those holes need filling or not?

If so, with what?

Will the imitation sponge stand up to spray paint?

What will he use for foliage?

The tension is unbearable.

Thinks ... I must get larger underpants!


Mordor Uruk Hai two

Three Mordor Uruks nearly finished.

Again, they are varnished and they've had their toes done.

I notice, though, that two of them need their hair doing.

Of course, all three need basing.

This will be done when the four crossbow men are ready, sometime next week.

Thursday 30 March 2017

Mordor Uruk Hai One

Here's the first of the three Mordor Uruk Hai.

He's not had his base done, as is evident, nor has he had a coat of varnish.

He'll also need an eye somewhere on his clothing.

I've, also, just noticed that he's not seen Nina about his toes which need a spot of Dark Flesh.

There is more contrast in the base colour and highlighting than shown though it is much more subdued than most you see.

I blame the fact that I wear 3.5 times magnifiers for my painting.


Ugluk

I'm working on Ugluk, shown, and, almost as a batch lot, three crossbow men with their leader Vrasku and three Mordor Uruk Hai.

Ugluk is nearly done though I've yet to decide if I can take a shine to him in his gloss varnish or if I should use matt varnish to dull it down.

Not too much trouble with metal protuding this time, though I figured gloss varnish would make sure of it.

I also have to paint round the base but I'll do that when they're all ready.

A package of Minas Tirith soldiery arrived from Ebay during the week.

They will eventually join the Osgiliath Vets.


'Looks like meat's back on the menu boys!'


Friday 24 March 2017

John's Oak 2

Now for the truth.

John photographed this real tree and then hired a 3D printer to produce a copy of the trunk and lower branches.

The printer caught fire while trying to produce the 376,000 leaves.

John's Hobbiton Oak

John is continuing work on his Bag-End and here is the trunk of the oak tree.

Based on some twigs grafted and super-glued together, there are some excellent little touches.

The stumps in the second picture are made from rolled up toilet roll inner, covered with glue making growth rings visible without painting them on.

The scaly trunk is coated with old tea leaves and porridge oats (I kid you not) and painted with a stippling effect.

Excellent John. Now for the tricky bit - the 376,000 leaves that you have to paint and glue on.


Osgiliath Ruin 3

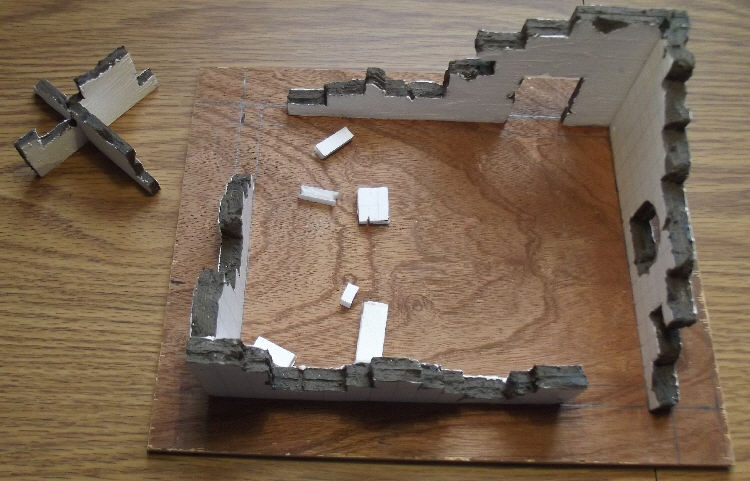
The finished ruin with lots of errors.

As usual, I learned plenty while constructing and, in particular, painting the model.

The overhead view shows two sections of floorboards though I doubt there would be many left after hundreds of years defending the place.

They'd have all gone for firewood, I mean, it does look a bit drafty.
One thing I'd do on construction is to glue the two sheets of foam card together and then cut through them, eliminating the 'ridge' of card in the center.

The big two on painting is spray grey rather than black and think about painting walls before assembly.
 There are some tricky corners when it's assembled.

Also, you need texture everywhere - not just on the exterior walls
 The close up shows the wallpaper pavement which I think works well.

The last shot shows how not to go about it.

I tried painting in Fortress grey and then dry-brushing white.

Dawnstone spray, then work up to white through Fortress grey, I think.

Do watch out for melting foam in the boards.

I protected the walls with 'Dark Earth' but filler/glue mix would have done the job while texturing.

The loose wall sections were protected with glue which failed to work.

I had to fill them up again with filler/glue.


Wednesday 22 March 2017

Osgiliath ruin

I've found a wallpaper that will do, I think.

A test spray and dry-brush seemed to give an impression of a patterned path.

We'll see how it looks around the building under a lick of paint..

Monday 20 March 2017

Osgiliath Ruin

To further prove that I've not been skiving, this is as far as I've got on the first Osgiliath ruin.

It's awaiting 'pavement' as I figure that the cobbles on the bases are from roads.

More wallpaper.

Avenger Vet, Bridge and Spear

Here's the new bridge that Blake and I put together at the weekend.

Thanks Blake.

Stood astride it it the finished 'Avenger Vet' .

He holds the banner scanned and printed by Mo last week.

Thanks Mo.


He also brandishes a half troll spear put together using bits from John's extensive 'bits box'.

Now retired, John was known in Stannah Lift III as 'The Scrounger' or was it 'The Lounger'?

Thanks John.


This vet is some warrior.

As well as wresting the spear from a half troll, you will see, at his feet, the results of a combat with a full sized one.

That's a troll finger cut from one holding a hammer.

River completed

Here  is the completed river and a couple of close ups.

The grain of the ply can be plainly seen despite a coat of primer-undercoat from the shed.

 I guess I should have checked before applying my deep blue mix and water effect glue.

I think the deep/shallow look has worked faily well by dry-brushing

Not knowing which direction of water flow made painting ripples tricky.
That's because the five section river can be assembled in so many different ways.

The last pic is of the ford.

I realised, at the last moment, that I'd need to show some traffic wearing out the grass both sides.

I forgot this at the bridge.

I now need a number of small sections to make the river reach from one side of the battle field to the other. It falls inches short and would result in a flood.

Saturday 11 March 2017

River 1

 Here's the first stab at the river. I use filler on and around 5mm foam card for the banks and then painted them with textured masonry paint. I then sprayed it all over with Caliban Green. The river side of the banks were dry brushed grey and static grass glued on top. The river bed was painted in a deep blue/green colour made as a sampler to my colour example. The ends were taped and a water/PVA mix poured in.
 Well, I've learned plenty. The wood grain is clearly visible through th PVA so seal the bed well before using water effect. When mixing the PVA I introduced bubbles which are spoiling it. The mix was so thin that it ran from the ends despite the tape.
The tops of the bank are far too regular. Use more filler on top.
I'd hoped for a green slime look in the muddy bank but seem to have overdone the grey dry brushing. It is still just visible in the close up of the rock but I'd hoped for more.

Incidentally, Blake did most of the glueing of the built up banks and applied some of the filler.

Wednesday 8 March 2017

Osgiliath Veterans 11

Here's a start on the Avenger Bolt Thrower conversion to an Osgiliath Veteran.

His left hand will hold the brass rod now that he's 'got a grip', after the use of a pair of pliers.

The hole in the base lines up well.

I need a spear tip for the brass rod and a Minas Tirith banner.

I was awake a chunk of last night, wondering what to put in his right hand.

It can't be a sword as his is sheathed unless I clip and file it away.

River and Bridge 1

Here are the river sections that Blake and I were building on Monday, with Bridge 1 in situ.

Then a close up of Bridge 1.

It sits in slots in the bank so that it can be replaced by an improved bridge with hand rails or a broken down bridge or simply removed altogether so that orcs will have to go the long way round.

Perhaps up to the ford on the left.

The river is about 4ft long.

(Note the bridge is far to low for trolls to live beneath)


Tuesday 7 March 2017

Bridge Number 1

I went down to Bristol yesterday and, taking a leaf from Brunel's book and taking advice from bridge designer Blake, Grandson extraordinaire, put together wooden tea stirrers and a rocket stick, to make a bridge.

Here's the lad pointing to a small error and watching me not fixing it correctly, thinking, 'You Wally!'


What a team!

Saturday 4 March 2017

Osgiliath Veterans 10


 Well, I think that's all of them. The satchel, 2nd down, is a piece of tarp from a Flames of War tank. The box like object I cut from a thin strip of kitchen flooring. The cloak, sacks and other bags are all Green Stuff and the axe, above, I borrowed from a spare Gimli.

Near miss that as was the orc spear through the shield in the third shot.


Friday 3 March 2017

Osgiliath Veterans 9

So here he is.

Ugly devil, what.

His nose and eyes both suffered from the filing.

Hi nose is suitable for a Vet but his squity eyes make him one of the worst shots in the Gondorian army.

Osgiliath Veterans 8

 A first try at using green stuff for hair seems to be working out fairly well.

I'd cut and filed away a helmet from the Gondor owner, leaving the poor chap bald, and then, using green stuff in thin rolls, filled in the gap.

I wanted long hair as well as the lack of a helmet to make him look the part of a Veteran of Osgiliath.

I imagine these guys as the SAS of their times. Using weapons of choice and not always keeping to regulation dress. Letting their hair down, so to speak.
 I added a rather large bag.

As you can imagine, shampoo, brush, pedal powered hair dryer and hair spray are all in there.

Rather than thin rolls of green stuff, I wonder how a lump, spread out and sculptured, would work out.

I rather think that the GW guys do it that way.

I won a bid on Ebay for two O/P metal Minas Tirith warriors with different stances from any I have, or so I thought.

The penny has dropped since. They are crew to a Avenger Bolt Thrower. Not for long they're not!